Expose Strategies
This chapter describes the control plane expose strategies in the Kubermatic Kubernetes Platform (KKP). The expose strategy defines how the control plane components (e.g. Kubernetes API server) are exposed outside the seed cluster - to the worker nodes and the actual cluster users.
The expose strategies rely on a component called nodeport-proxy. It is a L4 service proxy based on Envoy, capable of routing the traffic based on TCP destination port, SNI or HTTP/2 tunnels, depending on which expose strategy is used.
There are 3 different expose strategies in KKP: NodePort, LoadBalancer and Tunneling.
Different user clusters in KKP may be using different expose strategies at the same time.
NodePort
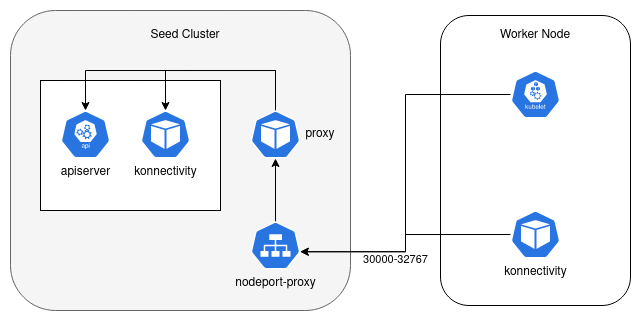
NodePort is the default expose strategy in KKP. With this strategy a k8s service of type NodePort is created for each exposed component (e.g. Kubernetes API Server) of each user cluster. This implies, that each apiserver will be exposed on a randomly assigned TCP port from the nodePort range configured for the seed cluster.

Each cluster normally consumes 2 NodePorts (one for the apiserver + one for the worker-nodes to control-plane “tunnel”), which limits the number of total clusters per Seed based on the NodePort range configured in the Seed cluster.
By default, the nodeport-proxy is enabled for this expose strategy. If services of type LoadBalancer are available in the Seed, all the services of all user clusters will be made available through a single LoadBalancer service in front of the nodeport-proxy. This approach however has a limitation on some cloud platforms, where the number of listeners per load balancer is limited, which can limit the total number of user clusters per Seed even more. The nodeport-proxy can be disabled if your platform doesn’t support LoadBalancer services or if the front LoadBalancer service is not required.
LoadBalancer
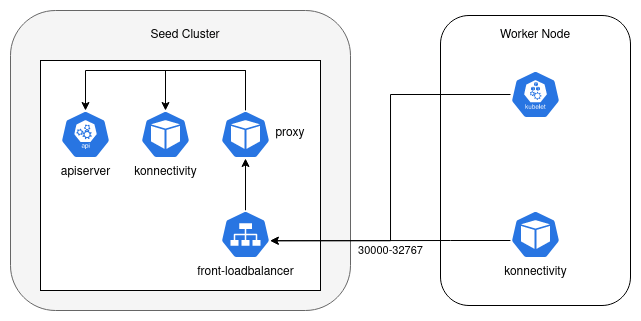
In the LoadBalancer expose strategy, a dedicated service of type LoadBalancer will be created for each user cluster. This strategy requires services of type LoadBalancer to be available on the Seed cluster and usually results into higher cost of cloud resources. However, this expose strategy supports more user clusters per Seed, and provides better ingress traffic isolation per user cluster.

The port number on which the apiserver is exposed via the LoadBalancer service is still randomly allocated from the NodePort range configured in the Seed cluster.
Tunneling
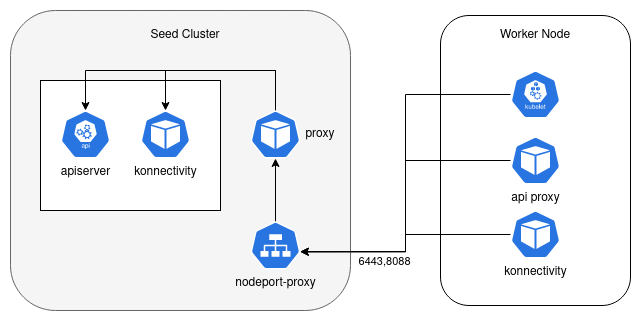
The Tunneling expose strategy addresses both the scaling issues of the NodePort strategy and cost issues of the LoadBalancer strategy. With this strategy, the traffic is routed to the based on a combination of SNI and HTTP/2 tunnels by the nodeport-proxy.

Another benefit of this expose strategy is that control plane components of each user cluster are always exposed
on fixed port numbers: 6443 for the apiserver and 8088 for the worker-nodes to control-plane “tunnel”.
This allows for more strict firewall configuration than exposing the whole nodePort range.
Note that only the port 6443 needs to be allowed for external apiserver access, the port 8088 needs to be allowed
only between the worker-nodes network and the seed cluster network.
The following limitations apply to the Tunneling expose strategy:
- It is not supported in set-ups where the worker nodes should pass from a corporate proxy (HTTPS proxy) to reach the control plane.
- An agent is deployed on each worker node to provide access to the apiserver from
within the cluster via the
kubernetesservice. The agent binds the IP used as thekubernetesservice endpoint. This address can not collide with any other address in the cluster / datacenter. The default value of tunneling agent IP is100.64.30.10. The default value can be changed via the cluster API (spec.clusterNetwork.tunnelingAgentIP).
Configuring the Expose Strategy
The expose strategy can be configured at 3 levels:
- globally,
- on Seed level,
- on User Cluster level.
Seed level configuration overrides the global one, and user cluster level configuration overrides both.
Global Configuration
The expose strategy can be configured globally with the KubermaticConfiguration as follows:
apiVersion: kubermatic.k8c.io/v1
kind: KubermaticConfiguration
metadata:
  name: kubermatic
  namespace: kubermatic
spec:
  exposeStrategy: NodePort
The valid values for the exposeStrategy are NodePort / LoadBalancer / Tunneling.
NOTE: If the exposeStrategy is not specified in the KubermaticConfiguration, it would default to NodePort.
Seed Level Configuration
The expose strategy can be overridden at Seed level in the Seed CR, e.g.:
apiVersion: kubermatic.k8c.io/v1
kind: Seed
metadata:
  name: kubermatic
  namespace: kubermatic
spec:
  # Override the global expose strategy with 'LoadBalancer'
  exposeStrategy: LoadBalancer
User Cluster Level Configuration
The expose strategy can be also overridden on the user cluster level. To do that, configure the
desired expose strategy in cluster’s spec.exposeStrategy in the cluster API, for example:
apiVersion: kubermatic.k8c.io/v1
kind: Cluster
metadata:
  name: clustername
spec:
  # Override the expose strategy for this cluster only
  exposeStrategy: Tunneling
Disabling Nodeport-Proxy for the NodePort Expose Strategy
By default, the nodeport-proxy is enabled when using the NodePort expose strategy.
If services of type LoadBalancer are available in the Seed, all the services of all user clusters will be made
available through a single LoadBalancer service in front of the nodeport-proxy.
The nodeport-proxy can be disabled if your platform doesn’t support LoadBalancer services or if the front LoadBalancer service is not required.
If nodeport-proxy is disabled, the DNS entries for the Seed cluster need to point directly to the Seed cluster’s node IPs. Note that this approach has limitations in case of Seed cluster node failures and DNS entries need to be manually re-configured upon Seed cluster node rotation.
The nodeport-proxy can be disabled at the Seed level, as shown on the following example:
apiVersion: kubermatic.k8c.io/v1
kind: Seed
metadata:
  name: kubermatic
  namespace: kubermatic
spec:
  # Configure the expose strategy to NodePort and disable the nodeport-proxy
  exposeStrategy: NodePort
  nodeportProxy:
    disable: true
Migrating the Expose Strategy for Existing Clusters
The expose strategy of a user cluster normally cannot be changed after the cluster creation. However, for experienced KKP administrators, it is still possible to migrate a user cluster from one expose strategy to another using some manual steps.
This procedure will cause temporary outage in the user cluster, so it should be performed during a maintenance window. It is also recommended trying this procedure first on a testing cluster with the same setup (same Seed, same cloud provider, same worker node OS images, etc.) before performing it on a production cluster.
Step 1
In order to allow the expose strategy migration, the cluster first needs to be labeled with the unsafe-expose-strategy-migration label (e.g. unsafe-expose-strategy-migration: "true").
By putting this label on your cluster you acknowledge that this type of upgrade is not supported by Kubermatic and you are fully responsible for the consequences it may have.
It is recommended to suspend/terminate all workloads (e.g. by draining all active nodes via kubectl drain) as all nodes will
lose connectivity to the cluster control plane upon updating the expose strategy. Therefore, updating the expose strategy
in the next step will stop the ability to coordinate and properly terminate workloads on existing nodes. A planned shutdown
might be desired to prevent potential data loss in your application stack.
Step 2
At this point, you are able to change the expose strategy of the cluster in the Cluster API.
Change the Cluster spec.exposeStrategy to the desired version:
either using KKP API endpoint
/api/v2/projects/{project_id}/clusters/{cluster_id},or by editing the cluster CR in the Seed Cluster (
kubectl edit cluster <cluster-name>).
When migrating from the Tunneling expose strategy (to any other), it is also necessary to delete the clusterNetwork.tunnelingAgentIP in the cluster spec.
Now wait until control-plane components in the seed cluster redeploy.
Step 3
At this point, all existing kubeconfig files used to access the cluster are invalid and not working anymore. To access the cluster, download a new kubeconfig file.
Step 4
Perform a rolling restart of all machine deployments in the user cluster. All nodes need to be rotated so that kubelet running on the nodes starts using the new API server endpoint, and all workloads in the cluster do the same as well. This can be done from KKP UI, or using kubectl, e.g.:
forceRestartAnnotations="{\"spec\":{\"template\":{\"metadata\":{\"annotations\":{\"forceRestart\":\"$(date +%s)\"}}}}}"
for md in $(kubectl get machinedeployments -n kube-system --no-headers | awk '{print $1}'); do
  kubectl patch machinedeployment -n kube-system $md --type=merge -p $forceRestartAnnotations
done
Afterwards, all Node objects that show up as NotReady should be deleted. No quick shell script is provided because
nodes might still be joining the cluster and temporarily show up as NotReady. Those should of course not be deleted.