Installation
Requirements
KKP supports KubeVirt Operator >= 0.19.0 and the Containerized Data Importer >= v1.19.0. It is strongly recommended to run the latest released version. A minimal Kubernetes cluster should consist of 3 nodes with 2 CPUs, 4GB of RAM and 30GB of storage.
KubeVirt on Kubernetes
Follow the official guide to install KubeVirt on Kubernetes
Configuration
KubeVirt requires the following configuration to be used with KKP.
- In case your KubeVirt namespace has the ConfigMap ‘kubevirt-config’ then use this ConfigMap for adding the feature gates to it. Look at the path
{.data.feature-gates} - Otherwise, add the feature gate to the resource of type
KubeVirt. There should be a single resource of this type and its name can be chosen arbitrarily.
The configuration KKP requires:
apiVersion: kubevirt.io/v1
kind: KubeVirt
metadata:
  name: kubevirt
  namespace: kubevirt
spec:
  configuration:
    developerConfiguration:
      featureGates:
      - DataVolumes
      - LiveMigration
      - CPUManager
      - CPUNodeDiscovery
      - Sidecar
      - Snapshot
      - HotplugVolumes
More information on the KubeVirt feature gates can be found here: KubeVirt Feature Gates
Usage
In order to allow KKP to provision VMs(worker nodes) in KubeVirt, users provide the kubeconfig of the Kubernetes cluster where the KubeVirt cluster is running (called the infra cluster). Users can add the content of the kubeconfig file in the third step of the cluster creation. The kubeconfig must be base64 encoded.
KKP MachineDeployment Sample
Here is a sample of a MachineDeployment that can be used to provision a VM:
apiVersion: "cluster.k8s.io/v1alpha1"
kind: MachineDeployment
metadata:
  name: my-kubevirt-machine
  namespace: kube-system
spec:
  paused: false
  replicas: 1
  strategy:
    type: RollingUpdate
    rollingUpdate:
      maxSurge: 1
      maxUnavailable: 0
  minReadySeconds: 0
  selector:
    matchLabels:
      name: my-kubevirt-machine
  template:
    metadata:
      labels:
        name: my-kubevirt-machine
    spec:
      providerSpec:
        value:
          sshPublicKeys:
            - "<< YOUR_PUBLIC_KEY >>"
          cloudProvider: "kubevirt"
          cloudProviderSpec:
            auth:
              kubeconfig:
                value: '<< KUBECONFIG >>'
            virtualMachine:
              template:
                cpus: "1"
                memory: "2048M"
                primaryDisk:
                  osImage: "<< YOUR_IMAGE_SOURCE >>"
                  size: "10Gi"
                  storageClassName: "<< YOUR_STORAGE_CLASS_NAME >>"
            affinity:
              podAffinityPreset: "" # Allowed values: "", "soft", "hard"
              podAntiAffinityPreset: "" # Allowed values: "", "soft", "hard"
              nodeAffinityPreset:
                type: "" # Allowed values: "", "soft", "hard"
                key: "foo"
                values:
                  - bar
          operatingSystem: "ubuntu"
          operatingSystemSpec:
            distUpgradeOnBoot: false
            disableAutoUpdate: true
      versions:
        kubelet: "1.18.10"
All the resources related to VM on the KubeVirt cluster will be created in a dedicated namespace in the infrastructure cluster.
This name follow the pattern cluster-xyz, where xyz is the id of the cluster created with KKP.
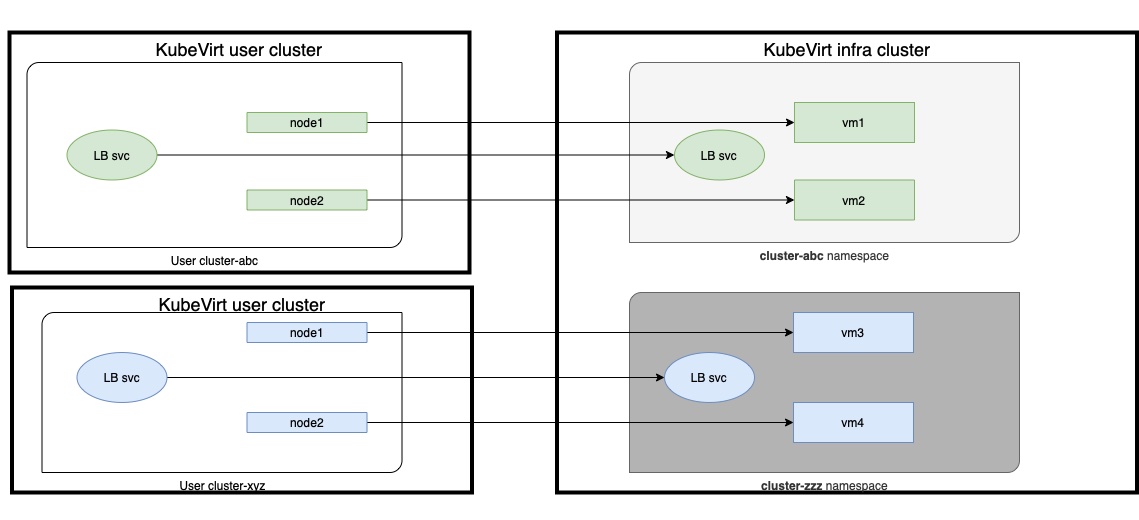
How to know the id of the cluster created ?
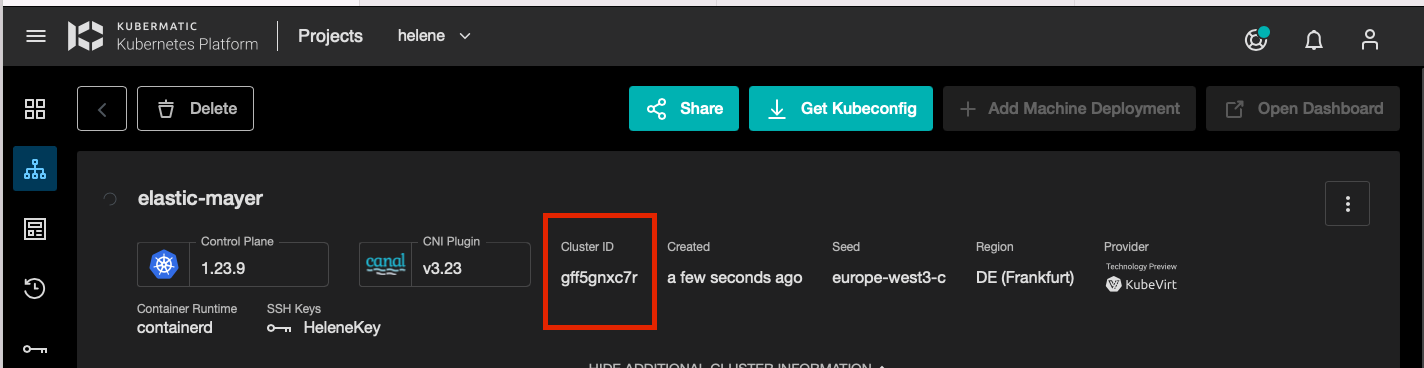
With the example of the previous image, the cluster elastic-mayer has a cluster id gff5gnxc7r,
so all resources for this cluster are located in the cluster-gff5gnxc7r namespace in the KubeVirt infrastructure cluster.
Virtual Machines Scheduling
It is possible to control how the tenant nodes are scheduled on the infrastructure nodes.
We provide 3 different types of scheduling for the KubeVirt tenant nodes:
- Ensure co-location on the same infrastructure node (Pod Affinity Preset).
- Prevent co-location on the same infrastructure node (Pod Anti Affinity Preset).
- Schedule on nodes having some specific labels (Node Affinity Preset).
This setup is done in the Initial Nodes step of KKP dashboard when creating a cluster.
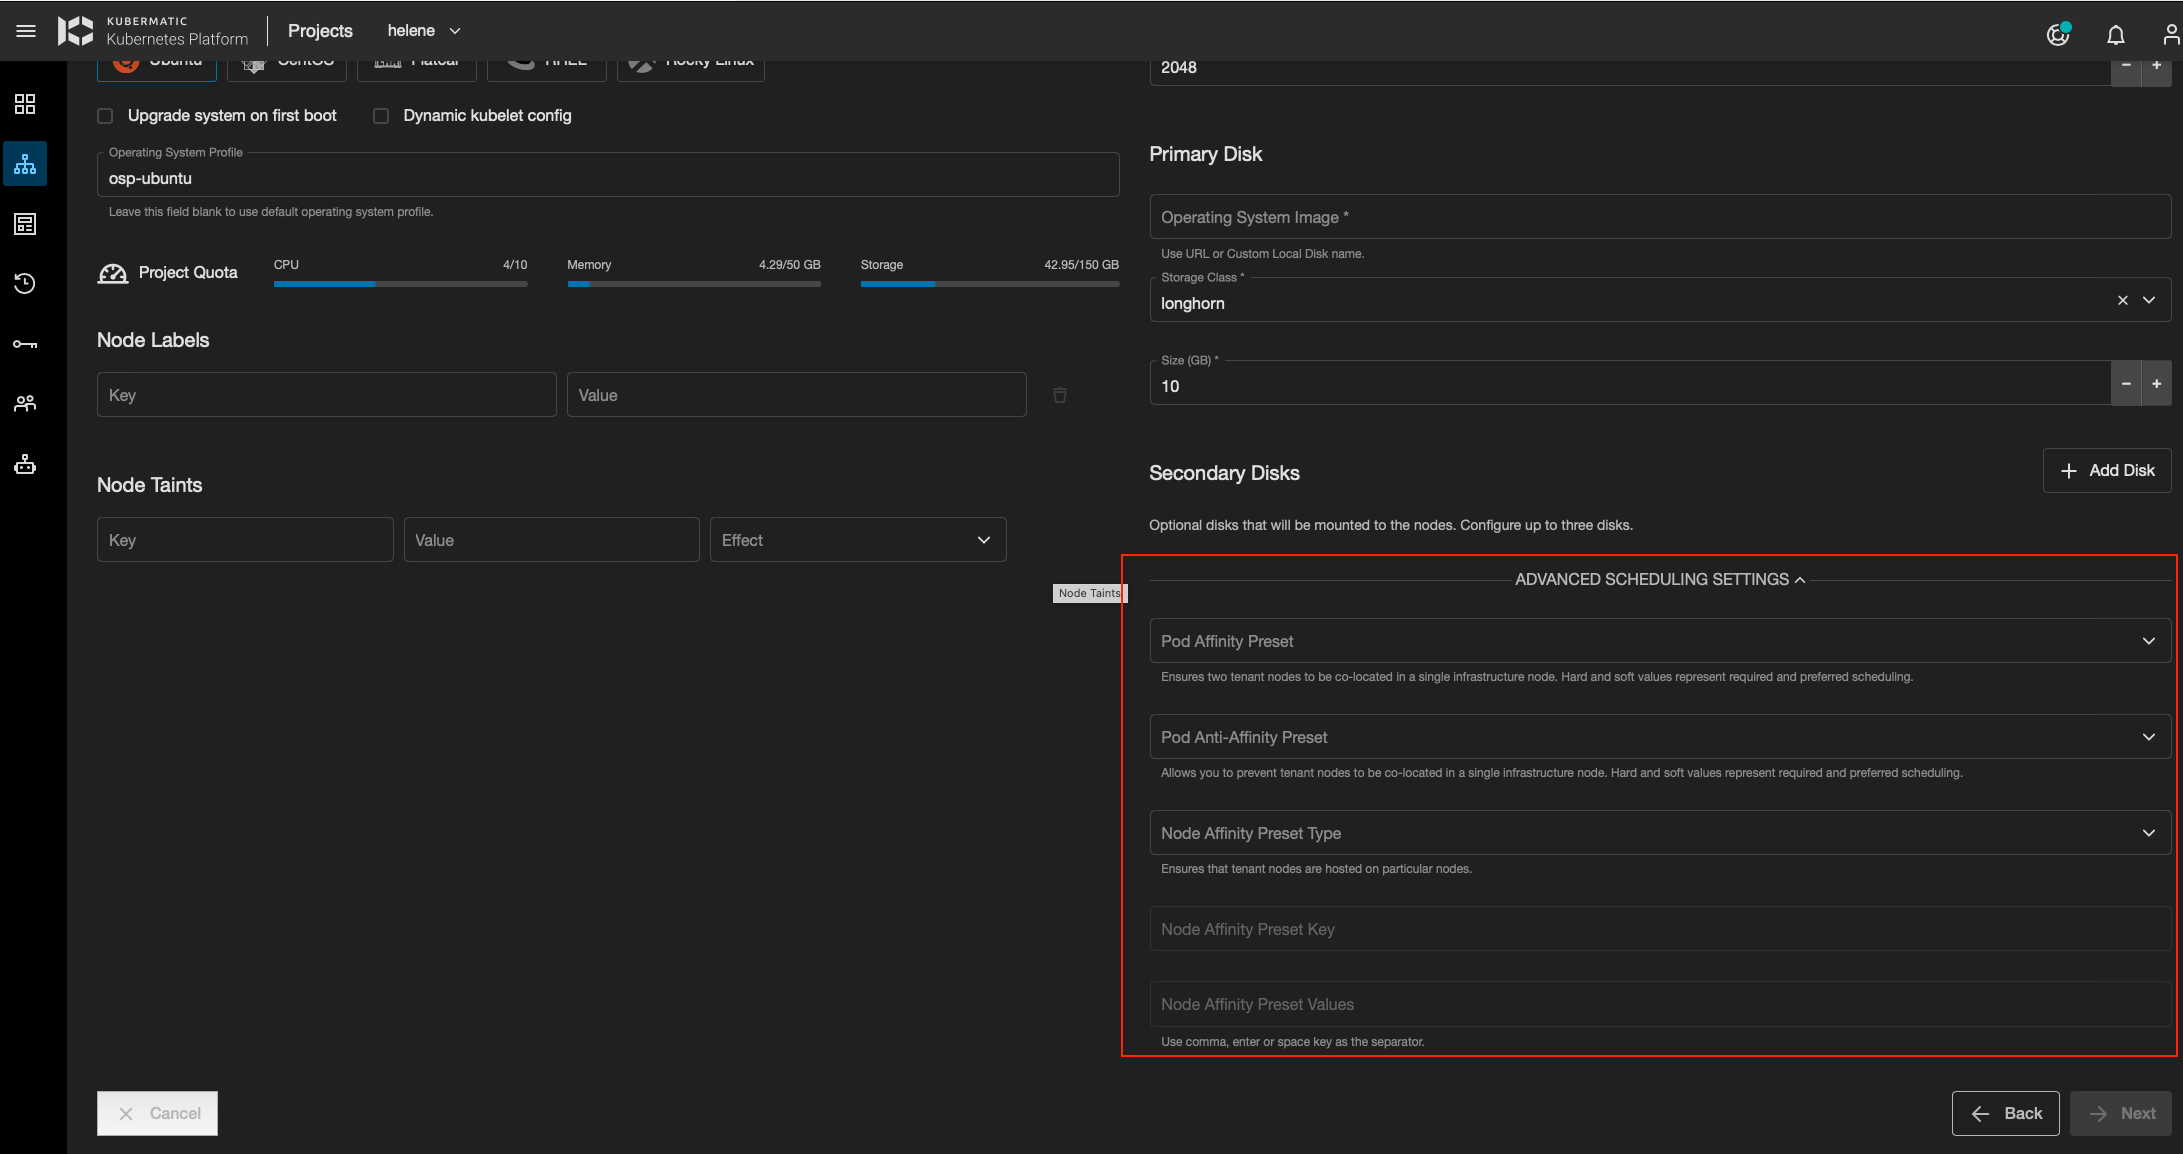
For each of this scheduling types (Pod Affinity Preset, Pod Anti Affinity Preset, Node Affinity Preset), we can also specify if we want the affinity to be:
- “hard”
- “soft”
To achieve this goal, we use the KubeVirt VM Affinity and Anti-affinity capabilities.
“hard” or “soft” are related to the Kubernetes: Assigning Pods to Nodes. The following table shows the mapping:
| Affinity type | Kubernetes affinity |
|---|---|
| hard | requiredDuringSchedulingIgnoredDuringExecution |
| soft | preferredDuringSchedulingIgnoredDuringExecution |
How scheduling settings influence a MachineDeployment object
Scheduling settings are represented in the MachineDeployment object under spec.providerSpec.value.affinity:
kind: MachineDeployment
spec:
 // ...
  template:
    spec:
      providerSpec:
        value:
            // ....
            affinity:
              podAffinityPreset: "" # Allowed values: "", "soft", "hard"
              podAntiAffinityPreset: "" # Allowed values: "", "soft", "hard"
              nodeAffinityPreset:
                type: "" # Allowed values: "", "soft", "hard"
                key: "foo"
                values:
                  - bar
// ....
Important Note:
podAffinityPresetandpodAntiAffinityPresetare mutually exclusive. The Anti-Affinity setting works the opposite of Affinity.podAffinityPresetcan be specified along withnodeAffinityPreset: this allows ensure that the KubeVirt tenant nodes are co-located on a single infrastructure node that has some specific labels.podAntiAffinityPresetcan be specified along withnodeAffinityPreset: this prevents the KubeVirt tenant nodes from being co-located on the same infrastructure node, but be located on infrastructure nodes that have some specific labels.
1- Usage of Pod Affinity Preset
With the following MachineDeployment specification
kind: MachineDeployment
spec:
 // ...
  template:
    spec:
      providerSpec:
        value:
            // ....
            affinity:
              podAffinityPreset: "hard" # or "soft"
// ....
The following VirtualMachine specification will be generated
- with affinity type “hard”:
VirtualMachine specification
kind: VirtualMachine
metadata:
  ...
spec:
  ...
  template:
    ...
    spec:
      affinity:
        podAffinity:
          requiredDuringSchedulingIgnoredDuringExecution: ### as affinity is "hard"
          - labelSelector:
              matchLabels:
                md: qqbxz6vqxl-worker-bjqdtt # label common to all VirtualMachines belonging to the same MachineDeployment
            topologyKey: kubernetes.io/hostname
- with affinity type “soft”:
VirtualMachine specification
kind: VirtualMachine
metadata:
  ...
spec:
  ...
  template:
    ...
    spec:
      affinity:
        podAffinity:
          preferredDuringSchedulingIgnoredDuringExecution: ### as affinity is "soft"
          - labelSelector:
              matchLabels:
                md: qqbxz6vqxl-worker-bjqdtt # label common to all VirtualMachines belonging to the same MachineDeployment
            topologyKey: kubernetes.io/hostname
2- Usage of Pod Anti Affinity Preset
With the following MachineDeployment specification
kind: MachineDeployment
spec:
 // ...
  template:
    spec:
      providerSpec:
        value:
            // ....
            affinity:
              podAntiAffinityPreset: "hard" # or "soft"
// ....
The following VirtualMachine specification will be generated
- with affinity type “hard”:
VirtualMachine specification
kind: VirtualMachine
metadata:
  ...
spec:
  ...
  template:
    ...
   spec:
      affinity:
        podAntiAffinity:
          requiredDuringSchedulingIgnoredDuringExecution:
          - labelSelector:
              matchLabels:
                md: qqbxz6vqxl-worker-bjqdtt # label common to all VirtualMachines belonging to the same MachineDeployment
            topologyKey: kubernetes.io/hostname
- with affinity type “soft”:
VirtualMachine specification
kind: VirtualMachine
metadata:
  ...
spec:
  ...
  template:
    ...
    spec:
      affinity:
        podAntiAffinity:
          preferredDuringSchedulingIgnoredDuringExecution: ### as affinity is "soft"
          - labelSelector:
              matchLabels:
                md: qqbxz6vqxl-worker-bjqdtt # label common to all VirtualMachines belonging to the same MachineDeployment
            topologyKey: kubernetes.io/hostname
3- Usage of Node Affinity Preset
With the following MachineDeployment specification
kind: MachineDeployment
spec:
 // ...
  template:
    spec:
      providerSpec:
        value:
            // ....
            affinity:
              nodeAffinityPreset:
                type: "hard" # or "soft"
                key: "foo"
                values:
                  - bar
The following VirtualMachine specification will be generated
- with affinity type “hard”:
VirtualMachine specification
kind: VirtualMachine
metadata:
  ...
spec:
  ...
  template:
    ...
   spec:
      affinity:
        nodeAffinity:
          requiredDuringSchedulingIgnoredDuringExecution:
            nodeSelectorTerms:
            - matchExpressions:
              - key: foo
                operator: In
                values:
                - bar
- with affinity type “soft”:
VirtualMachine specification
kind: VirtualMachine
metadata:
 ...
spec:
 ...
 template:
   ...
   spec:
     affinity:
       nodeAffinity:
         preferredDuringSchedulingIgnoredDuringExecution:
           nodeSelectorTerms:
           - matchExpressions:
             - key: foo
               operator: In
               values:
               - bar
Virtual Machines Templates
To create a VM from existing VirtualMachineInstancePresets,
add the following configuration under cloudProviderSpec.virtualMachine in MachineDeployment:
virtualMachine:
  flavor:
    name: "<< VirtualMachineInstancePresets_NAME >>"
  template:
    primaryDisk:
      osImage: "<< YOUR_IMAGE_SOURCE >>"
      size: "10Gi"
      storageClassName: "<< YOUR_STORAGE_CLASS_NAME >>"
To apply a VirtualMachineInstancePreset to a VM, this VirtualMachineInstancePreset should be created in the default namespace.
KKP will then copy into the dedicated clusterxyz namespace and start the VirtualMachine applying it.
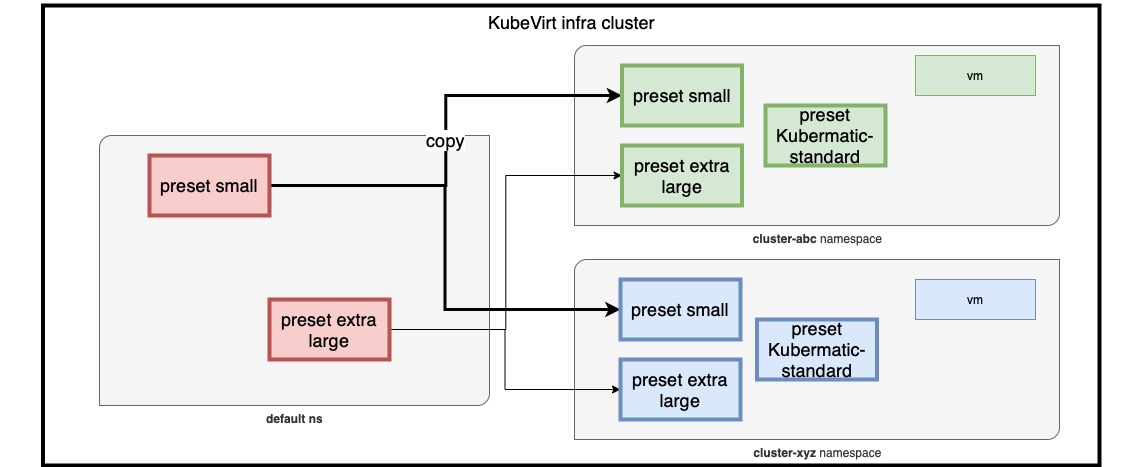
A default VirtualMachineInstancePreset named kubermatic-standard is always added to the list by KKP
(even if not existing in the default namespace).
{
apiVersion: kubevirt.io/v1
kind: VirtualMachineInstancePreset
metadata:
  name: kubermatic-standard
spec:
  domain:
    resources:
      requests:
        cpu: 2
        memory: 8Gi
      limits:
        cpu: 2
        memory: 8Gi
  selector:
    matchLabels:
      kubevirt.io/flavor: kubermatic-standard
}
To create new a VirtualMachineInstancePreset usable to apply to new VMs, create it in the default namespace.
It will be present in the VM Flavor dropdown list selection and be copied in the right namespace by KKP.
Note 1: Update of a VirtualMachineInstancePreset in the default namespace.
What happens if we update a VirtualMachineInstancePreset existing in the default namespace ?
- The updated
VirtualMachineInstancePresetwill be reconciled from thedefaultnamespace into thecluster-xyznamespace. Give it some time to be reconciled. The reconciliation interval is configurable (refer toproviderReconciliationIntervalin Seed configuration - For all
VirtualMachineInstancesalready created, this will have no impact. Please refer to KubeVirt Preset documentation - The update will then be effective for new
VirtualMachineInstances.
Note 2: Limitation of the list of reconciled fields.
Please note that not all fields of the VirtualMachineInstance are merged into the VirtualMachineInstance.
For the domain, only the following fields are merged:
CPUFirmwareClockFeaturesDevices.WatchdogIOThreadsPolicy
Note3: Migration to the instanceType API
Please note that in the next KKP release, we will migrate to the new VirtualMachineInstancetype (alpha release),
as the VirtualMachineInstancePreset will be deprecated. This will for example lift the limitation around the list of
merged fields from the VirtualMachineInstance and provide deterministic behavior with immediate detection of merge conflicts.
Virtual Machines Disks
Basic Disk Configuration
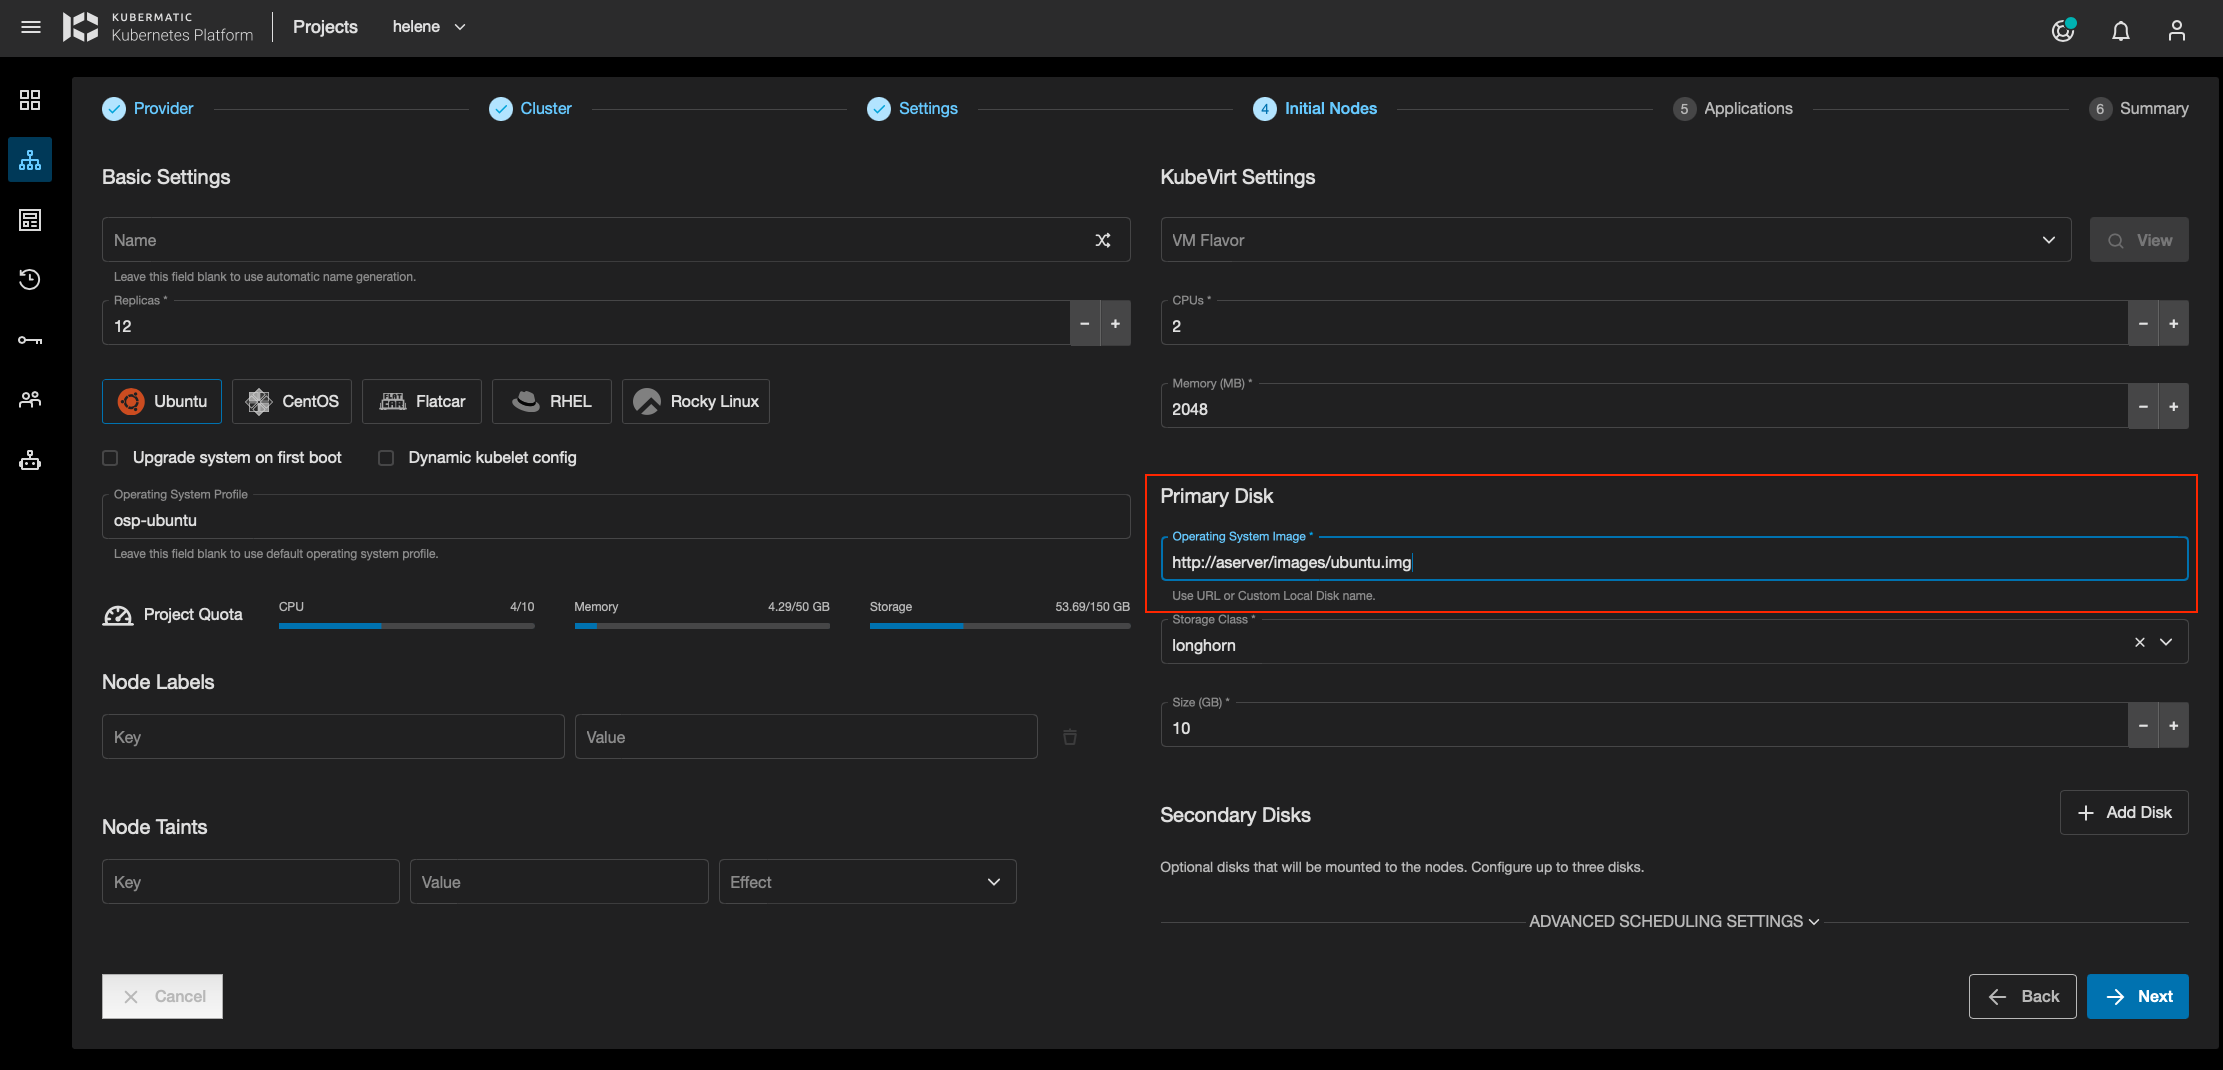
For the basic configuration, disk images are imported from a web server, via HTTP download,
by specifying a URL when creating a cluster, at the Initial Nodes step, in the Primary Disk section as shown in the screenshot below.
Custom Local Disk
Custom local disks are disks created during cluster initialization that can be referenced later when creating nodes. Reference the custom local disk by name in the node’s primary disk field. The disk will be cloned instead of being downloaded from the HTTP source URL.
The feature relies on Data Volumes from the Containerized Data Importer project. Custom local disk creates a Data Volume on KubeVirt cluster in the user cluster namespace.
NOTE: the source DataVolume (Custom Local Disk) must exist in the cluster-xyz namespace where the VM is created. Cloning across namespaces is not allowed.

The source DataVolume can be created manually (not from KKP) by the user in the cluster-xyz namespace,
or it can also be created using KKP when creating the cluster at the Settings step, with the Advanced Disk configuration panel.
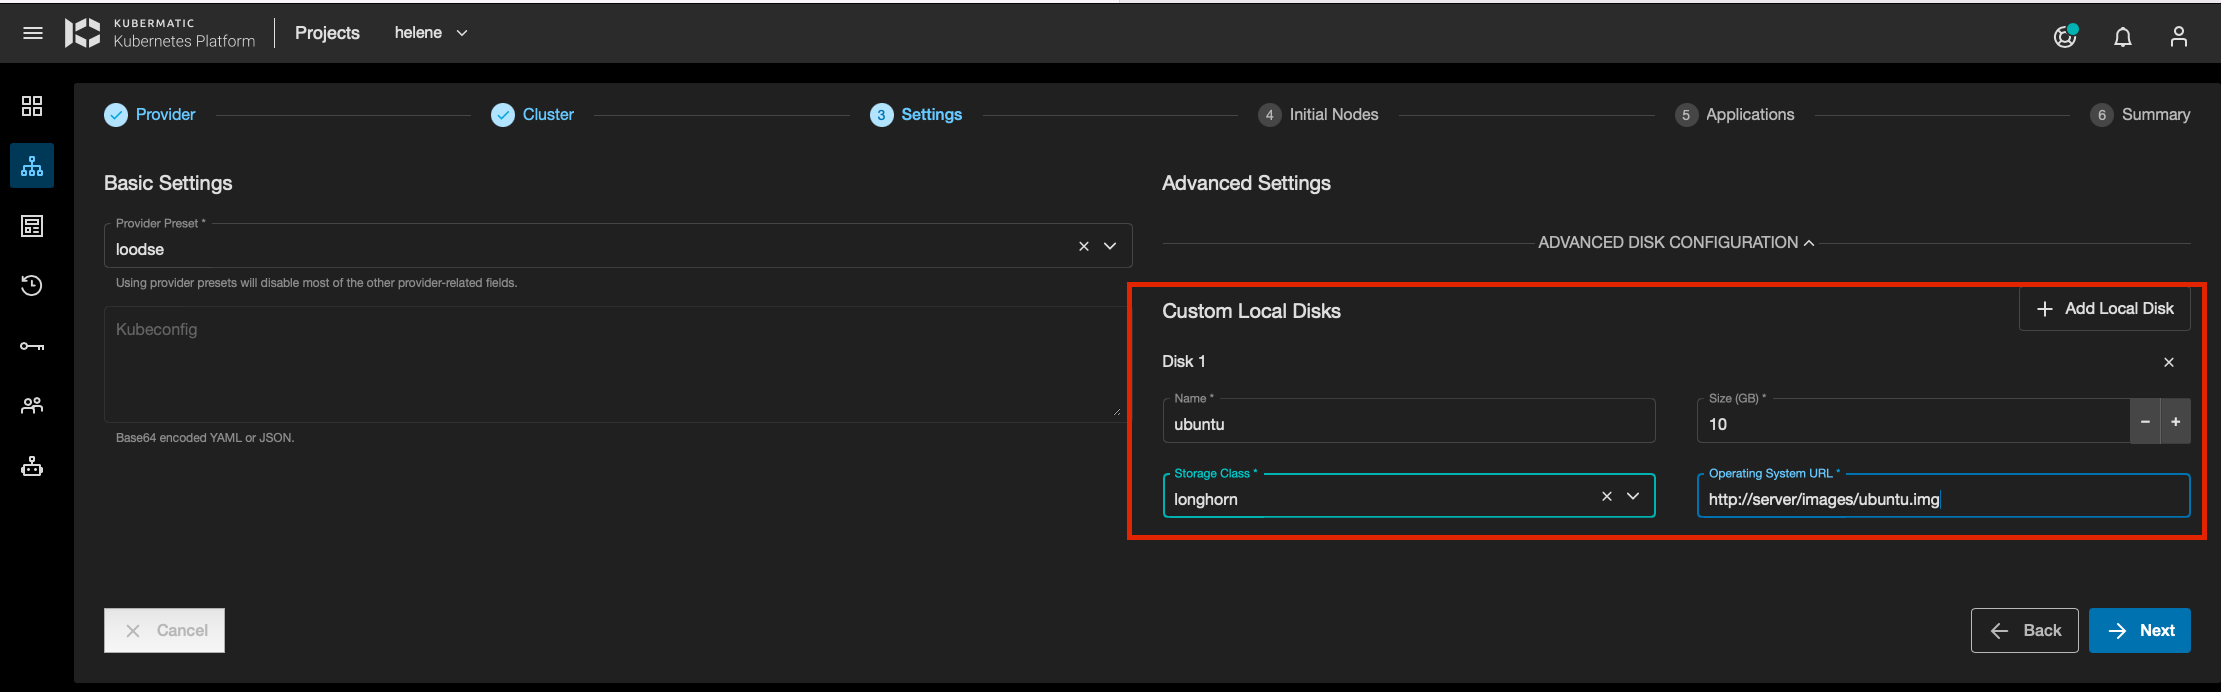
In this panel, the user can add several Custom Local Disks (DataVolumes). For each of them, the user must specify:
- the disk name (DataVolume name, must be compliant with Kubernetes object names constraints)
- the Storage Class from a dropdown list
- the disk size
- the image disk URL for image download.
The same Custom Local Disk can be used as source of cloning for all the VMs (same MachineDeployment or not) in the same cluster.
Secondary Disks
Secondary disks are additional disks that can be attached to nodes (up to three disks). The feature is under heavy development, and it is functionality might change over time.
Currently, blank Data Volumes are being created and attached to nodes, meaning it is up to the cluster admin to format the disks that they are being usable.
It is not recommended to use those disks in production environment yet.
Storage Class Initialization
KKP uses Containerized Data Importer (CDI) to import images and provision volumes to launch the VMs. CDI provides the ability to populate PVCs with VM images or other data upon creation. The data can come from different sources: a URL, a container registry, another PVC (clone), or an upload from a client. For more information about Containerized Data Importer project, please follow the documentation here.
To initialize a storage class on a user cluster that exists on the KubeVirt infrastructure cluster.
add kubevirt-initialization.k8c.io/initialize-sc: 'true' annotation to the storage class of your choice.
This action has to take place before user cluster creation.
Monitoring
Install prometheus-operator on KubeVirt cluster.
Then update KubeVirt resource similar to this example:
apiVersion: kubevirt.io/v1
kind: KubeVirt
metadata:
  name: kubevirt
spec:
  monitorNamespace: "<<PROMETHEUS_NAMESPACE>>"
  monitorAccount: "<<PROMETHEUS_SERVICE_ACCOUNT_NAME>>"
For more details refer this document.
After completing the above setup, you can import this KubeVirt-Dashboard in Grafana to monitor KubeVirt components.
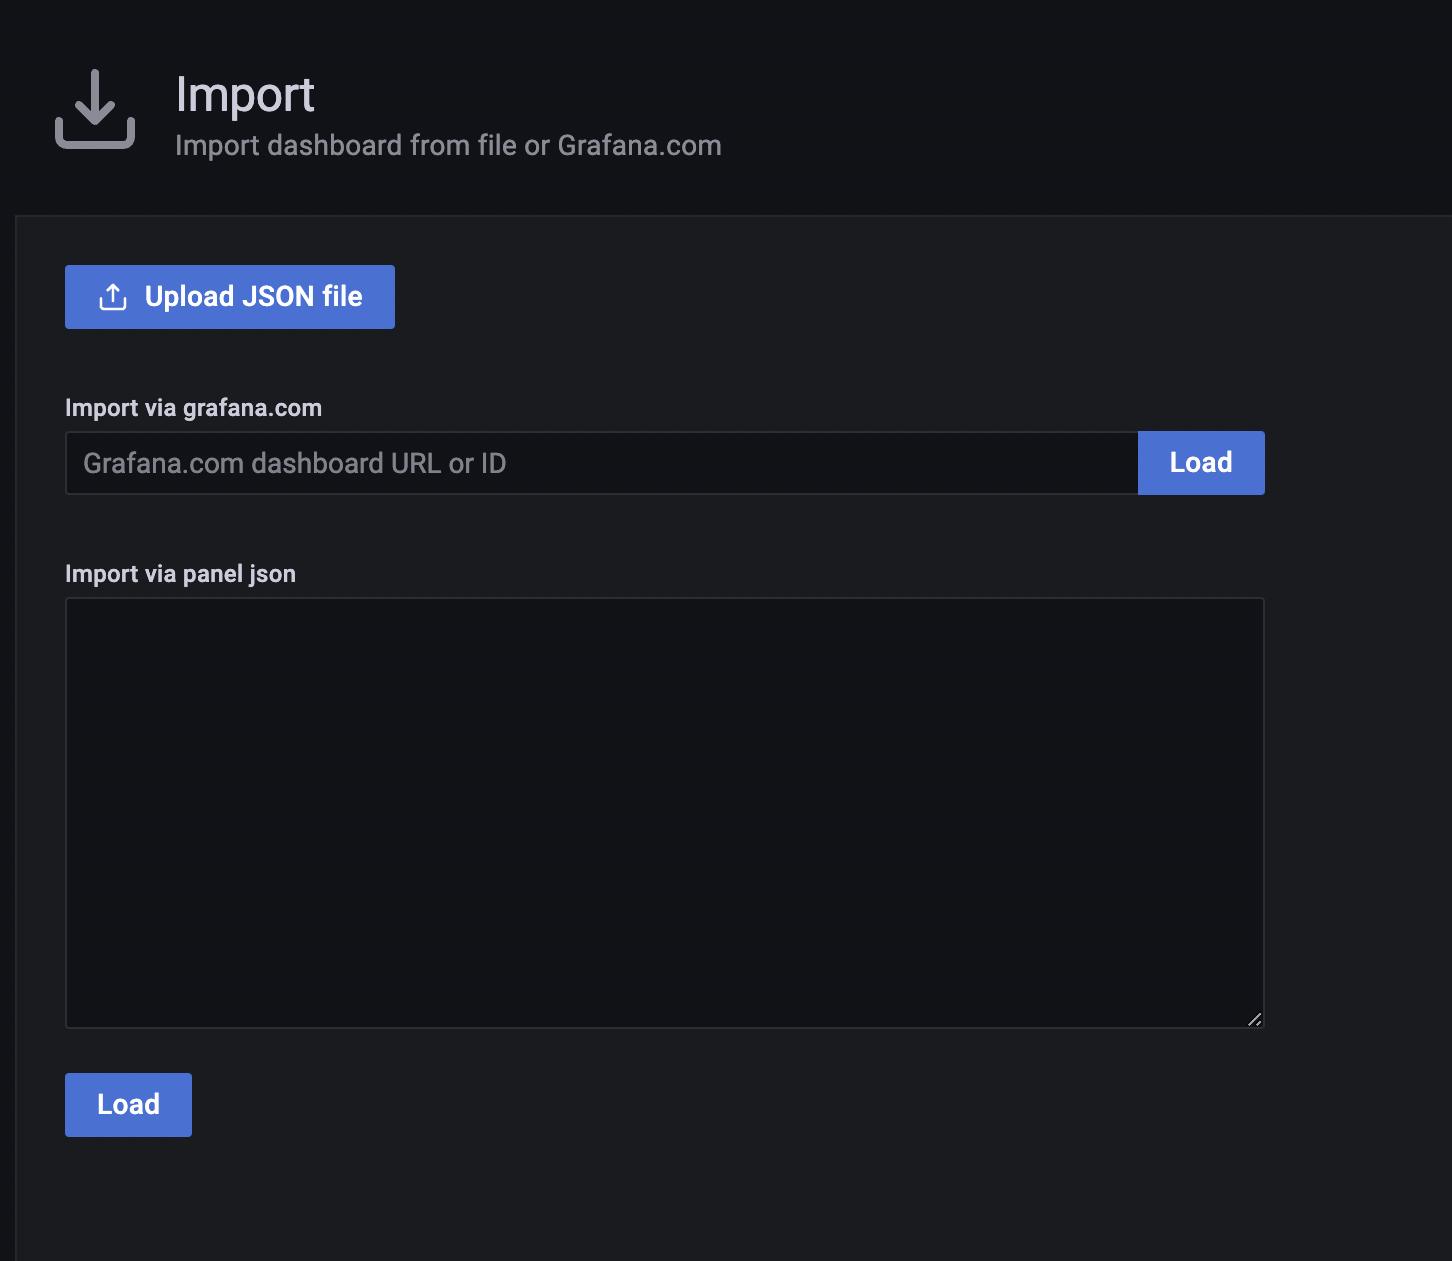
Follow the below steps to import the dashboard in Grafana:
- Download this KubeVirt-Dashboard.
- Open Grafana and click on
+icon on the left side of the application. After that selectImportoption. - In the below window you can upload the KubeVirt-Dashboard
jsonfile.
Breaking Changes
Please be aware that between KKP 2.20 and KKP 2.21, a breaking change to the MachineDeployment API for KubeVirt has occurred. For more details, please check out the 2.20 to 2.21 upgrade notes.