In this tutorial, we’re going to show how to use Kubermatic KubeOne to create a highly-available Kubernetes cluster. The tutorial covers downloading KubeOne and setting up the environment, creating the infrastructure using example Terraform configs, and finally, provisioning a cluster using KubeOne. As a result, you’ll get a production-ready and Kubernetes/CNCF conformant cluster, running on a cloud provider of your choice.
Prerequisites
This tutorial assumes that you’re using Linux or macOS. KubeOne currently doesn’t release Windows binaries. If you’re using Windows, we recommend checking out the Windows Subsystem for Linux (WSL).
How Kubermatic KubeOne Works
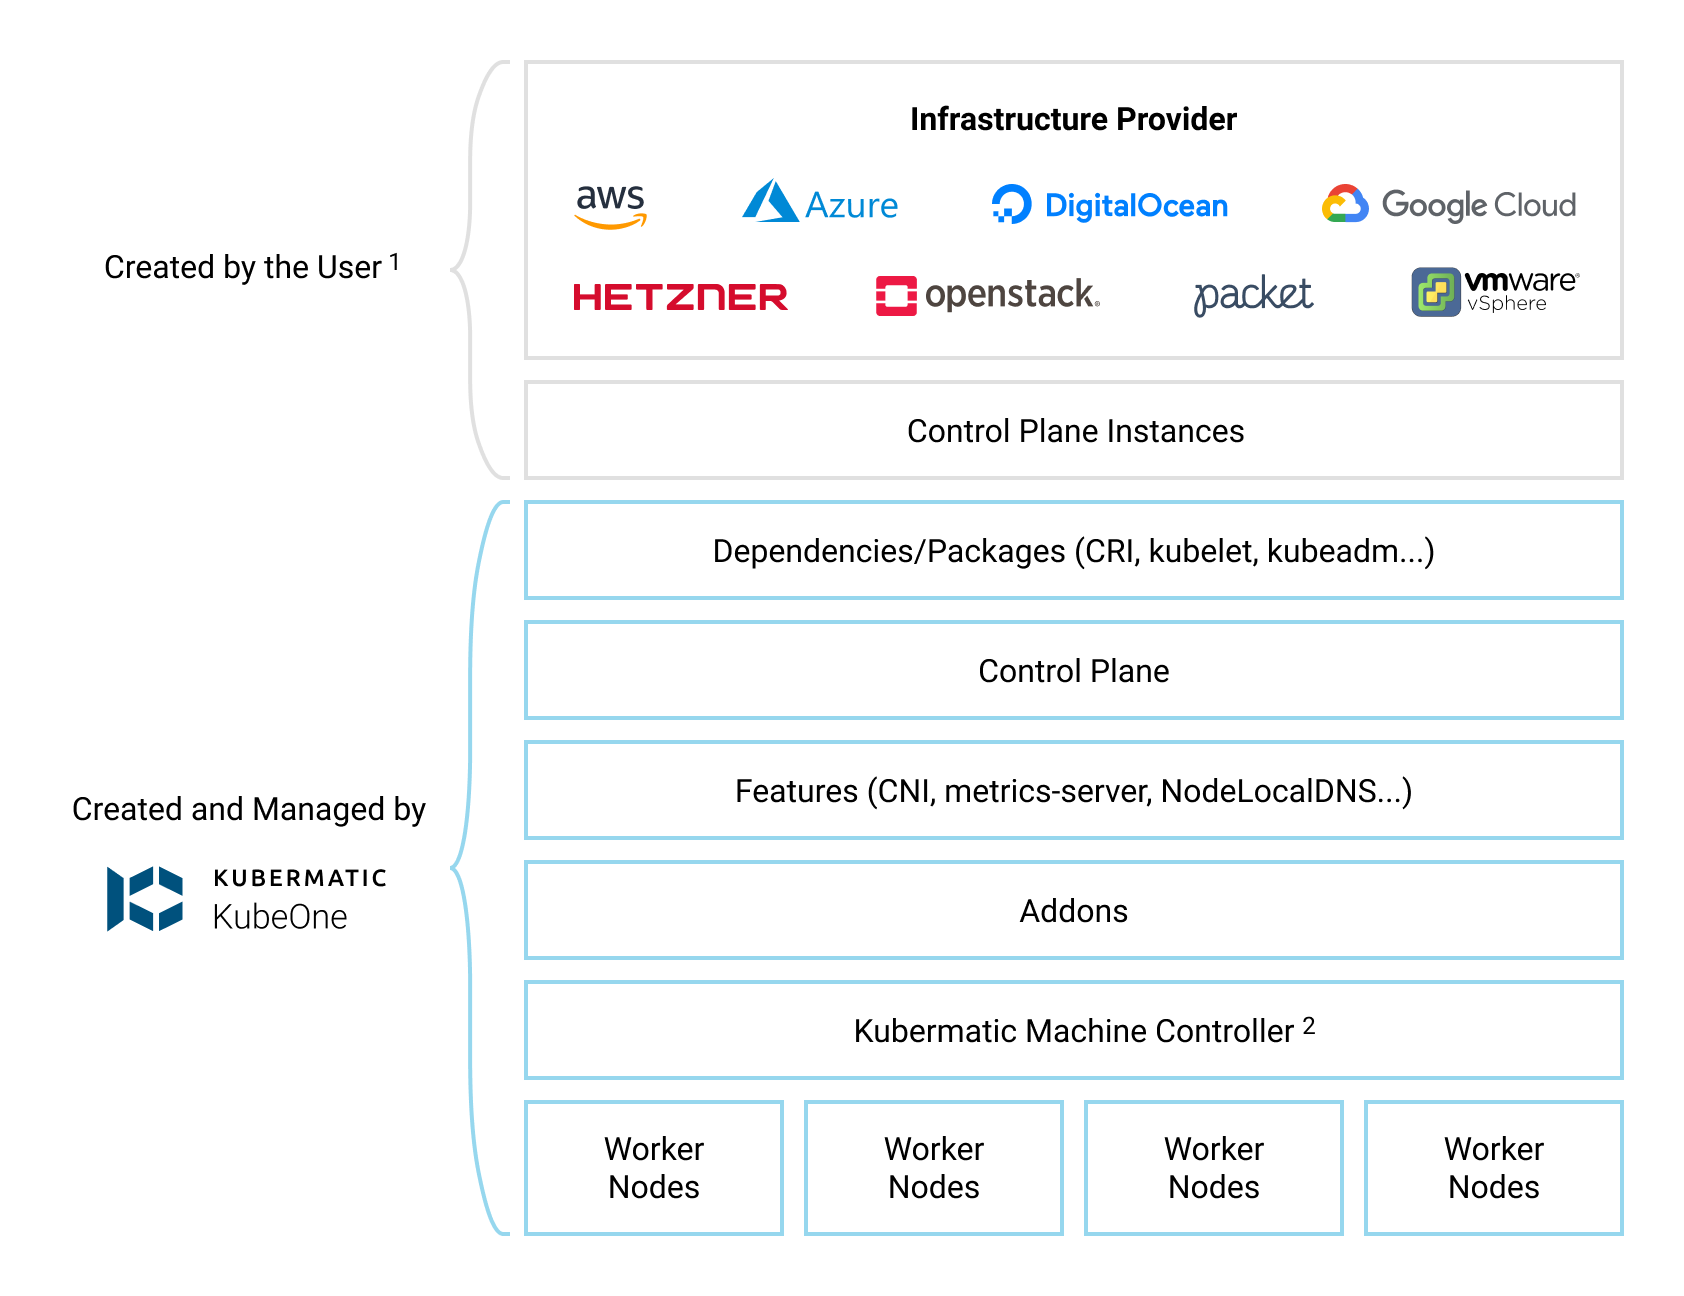
Kubermatic KubeOne is a CLI tool for managing highly-available Kubernetes clusters in any environment (cloud, on-prem, baremetal, edge…). Clusters created by KubeOne are production-ready and Kubernetes/CNCF conformant out of the box. Generally, KubeOne runs the following tasks:
- install dependencies and required packages (container runtime, kubelet, kubeadm…)
- run Kubernetes’ Kubeadm to provision a Kubernetes cluster
- deploy components such as CNI, metrics-server, and Kubermatic machine-controller
- create worker nodes by creating the appropriate MachineDeployment object(s)
Infrastructure Management
The infrastructure for the control plane is created by the user. This allows KubeOne to work with any provider out of the box. Once the infrastructure is created, the user provides information about the instances that will be used, the load balancer that’s running in the front of the control plane nodes, and the information that will be used later to create the worker nodes.
To make this task easier, KubeOne integrates with Terraform by reading the Terraform state, and provides example Terraform configs that can be used to create the infrastructure. We’ll use both the Terraform integration and the example configs in this tutorial.
The infrastructure for the worker nodes can be managed in two ways:
- automatically, by using Kubermatic machine-controller (deployed by default for supported providers)
- by creating the instances manually and using KubeOne to provision them
The first approach is recommended if your provider is natively-supported (AWS, Azure, DigitalOcean, GCP, Hetzner Cloud, Nutanix, OpenStack, Equinix Metal, and VMware vSphere), and we will use it in this tutorial. If your provider is not supported (e.g. bare-metal), you can check the KubeOne Static Workers feature for more information about the second approach.
The example Terraform configs that we’ll be using satisfy all infrastructure requirements out of the box. However, if you’re planning on customizing configs or using different approach, make sure to adhere to the requirements described in the Infrastructure Management document.
Below, you can find a diagram that shows how KubeOne works.
Default Configuration
By default, KubeOne installs the following components:
- Container Runtime: containerd for Kubernetes 1.22+ clusters, otherwise Docker
- CNI: Canal (based on Calico and Flannel)
- Cilium, WeaveNet, and user-provided CNI are supported as an alternative
- metrics-server for collecting and exposing metrics from Kubelets
- NodeLocal DNSCache for caching DNS queries to improve the cluster performance
- Kubermatic machine-controller, a Cluster-API based implementation for managing worker nodes
It’s possible to configure which components are installed and how they are
configured by adjusting the KubeOne configuration manifest that we’ll create
later in the Step 5 (Provisioning The Cluster). To see possible configuration
options, refer to the configuration manifest reference which can be obtained
by running kubeone config print --full.
Step 1 — Downloading KubeOne
The easiest way to download KubeOne is to use our installation script. The following command will download and run the script:
curl -sfL https://get.kubeone.io | sh
The script downloads the latest version of KubeOne from GitHub, and unpacks it
in the /usr/local/bin directory. Additionally, the script unpacks the example
Terraform configs, addons, and helper scripts in your current working
directory. At the end of the script output, you can find the path to the
unpacked files:
The addons and helper scripts are supposed to be used for advanced deployments and we will not use those in this tutorial. They’re not required by KubeOne, so you’re not required to keep to them.
...
Kubermatic KubeOne has been installed into /usr/local/bin/kubeone
Terraform example configs, addons, and helper scripts have been downloaded into the ./kubeone_1.4.0_linux_amd64 directory
You can confirm that KubeOne has been installed successfully by running the
kubeone version command. If you see an error, ensure that /usr/local/bin is
in your PATH or modify the script to install KubeOne in a different place.
You can also check the Getting KubeOne guide for alternative
installation methods.
Step 2 — Downloading Terraform
As described in the How KubeOne Works section, we’ll use Terraform to manage
the infrastructure for the control plane, therefore we need to install it.
Terraform has several installation methods: manually, using a package manager
such as apt, using Homebrew (for macOS users). In this tutorial, we’ll do it
manually, but you can check out the
official installation guide for other options.
First, visit the Terraform download page and grab the
link for the latest version for your platform and architecture.
KubeOne requires Terraform 1.0 or newer. You can download it from the
browser, or use cURL such as:
curl -LO https://releases.hashicorp.com/terraform/1.1.3/terraform_1.1.3_linux_amd64.zip
Once you download the archive, unzip it:
unzip terraform_1.1.3_linux_amd64.zip
Finally, move the unpacked terraform binary to somewhere in your PATH.
We’ll use /usr/local/bin for the purposes of this tutorial:
mv terraform /usr/local/bin
After that is done, Terraform is ready to be used. You can run
terraform version to check is it properly installed. If you see an error,
ensure that the directory where you moved the binary is in your PATH.
Step 3 — Configuring The Environment
KubeOne and Terraform require you to have the cloud provider credentials exported as the environment variables. Below you can find required environment variables for each natively-supported cloud provider.
You need an IAM account with the appropriate permissions for Terraform to create the infrastructure and for machine-controller to create worker nodes.
| Environment Variable | Description |
|---|---|
AWS_ACCESS_KEY_ID | The AWS Access Key |
AWS_SECRET_ACCESS_KEY | The AWS Secret Access Key |
AWS_PROFILE | Name of the profile defined in the ~/.aws/credentials file. This variable is considered only if AWS_ACCESS_KEY_ID or AWS_SECRET_ACCESS_KEY is unset |
The following environment variables are needed by machine-controller for creating worker nodes.
For the Terraform reference please take a look at Azure provider docs.
| Environment Variable | Description |
|---|---|
ARM_CLIENT_ID | Azure ClientID |
ARM_CLIENT_SECRET | Azure Client secret |
ARM_TENANT_ID | Azure TenantID |
ARM_SUBSCRIPTION_ID | Azure SubscriptionID |
You need an API Access Token with read and write permission for Terraform to create the infrastructure, machine-controller to create the worker nodes, and for DigitalOcean Cloud Controller Manager.
| Environment Variable | Description |
|---|---|
DIGITALOCEAN_TOKEN | The DigitalOcean API Access Token with read/write permissions |
You need an Service Account with the appropriate permissions for Terraform to create the infrastructure and for machine-controller to create worker nodes.
The needed permissions are are:
- Compute Admin:
roles/compute.admin - Service Account User:
roles/iam.serviceAccountUser - Viewer:
roles/viewer
If the gcloud CLI is installed,
a service account can be created like follow:
# create new service account
gcloud iam service-accounts create k1-cluster-provisioner

# get your service account id
gcloud iam service-accounts list
# get your project id
gcloud projects list

# create policy binding
gcloud projects add-iam-policy-binding YOUR_PROJECT_ID --member 'serviceAccount:YOUR_SERVICE_ACCOUNT_ID' --role='roles/compute.admin'
gcloud projects add-iam-policy-binding YOUR_PROJECT_ID --member 'serviceAccount:YOUR_SERVICE_ACCOUNT_ID' --role='roles/iam.serviceAccountUser'
gcloud projects add-iam-policy-binding YOUR_PROJECT_ID --member 'serviceAccount:YOUR_SERVICE_ACCOUNT_ID' --role='roles/viewer'
A Google Service Account for the platform has to be created, see Creating and managing service accounts.
The result is a JSON file containing the fields:
typeproject_idprivate_key_idprivate_keyclient_emailclient_idauth_uritoken_uriauth_provider_x509_cert_urlclient_x509_cert_url
# create a new json key for your service account
gcloud iam service-accounts keys create --iam-account YOUR_SERVICE_ACCOUNT k1-cluster-provisioner-sa-key.json
Also, the Compute Engine API has to be enabled for the project in the Google APIs Console.
Once you have the Service Account, you need to set GOOGLE_CREDENTIALS
environment variable:
# export JSON file content of created service account json key
export GOOGLE_CREDENTIALS=$(cat ./k1-cluster-provisioner-sa-key.json)
| Environment Variable | Description |
|---|---|
GOOGLE_CREDENTIALS | GCE Service Account |
You need a Hetzner API Token for Terraform to create the infrastructure, machine-controller to create worker nodes, and for Hetzner Cloud Controller Manager.
| Environment Variable | Description |
|---|---|
HCLOUD_TOKEN | The Hetzner API Access Token |
The following environment variables are needed by Terraform for creating the infrastructure and for machine-controller to create the worker nodes.
| Environment Variable | Description |
|---|---|
NUTANIX_ENDPOINT | The Nutanix API (Prism Central) endpoint |
NUTANIX_PORT | The Nutanix API (Prism Central) port |
NUTANIX_USERNAME | The username of the Nutanix user |
NUTANIX_PASSWORD | The password of the Nutanix user |
NUTANIX_PE_ENDPOINT | The Nutanix Prism Element endpoint (required by CSI driver) |
NUTANIX_PE_USERNAME | The username of the Prism Element user (might be different than the Prism Central user) |
NUTANIX_PE_PASSWORD | The password of the Prism Element user (might be different than the Prism Central user) |
Besides that, the following environment variables are available, but optional.
| Environment Variable | Description |
|---|---|
NUTANIX_INSECURE | Allow insecure access to the Nutanix API (default false) |
NUTANIX_PROXY_URL | The URL of the proxy to the Nutanix API |
NUTANIX_CLUSTER_NAME | The name of the Nutanix cluster (used by machine-controller if not specified in the MachineDeployment) |
The following environment variables are needed by Terraform for creating the infrastructure and for machine-controller to create the worker nodes.
| Environment Variable | Description |
|---|---|
OS_AUTH_URL | The URL of OpenStack Identity Service |
OS_USERNAME | The username of the OpenStack user |
OS_PASSWORD | The password of the OpenStack user |
OS_REGION_NAME | The name of the OpenStack region |
OS_DOMAIN_NAME | The name of the OpenStack domain |
OS_TENANT_ID | The ID of the OpenStack tenant |
OS_TENANT_NAME | The name of the OpenStack tenant |
You need an API Access Token for Terraform to create the infrastructure, machine-controller to create worker nodes, and for Equinix Metal Cloud Controller Manager.
| Environment Variable | Description |
|---|---|
METAL_AUTH_TOKEN | Equinix Metal auth token |
METAL_PROJECT_ID | Equinix Metal project ID |
The following environment variables are needed by machine-controller for creating the worker nodes.
For the Terraform reference, please take a look at vSphere provider docs
| Environment Variable | Description |
|---|---|
VSPHERE_SERVER | The address of the vSphere instance |
VSPHERE_USER | The username of the vSphere user |
VSPHERE_PASSWORD | The password of the vSphere user |
As credentials are deployed to the cluster, it’s recommended to use dedicated, non-administrator credentials whenever it’s possible.
To set the environment variable, use the export command such as:
export <VARIABLE_NAME>=<VARIABLE_VALUE>
Step 4 — Creating The Infrastructure
With KubeOne installed and the environment configured, we’re ready to create the infrastructure for our cluster. We’ll use the example Terraform configs for this step.
First, move to the directory with the example Terraform configs that has been created while installing KubeOne in the Step 1. For example (the directory name depends on the latest KubeOne version):
cd ./kubeone_1.4.0_linux_amd64/examples/terraform
In this directory, you can find a subdirectory for each supported provider. Move to the directory for a provider that you want to use. For example, if you want to run your cluster on GCP:
cd ./gce
Before we can use Terraform, we need to initialize the directory structure and
download the required plugins. This is done by using the init command:
terraform init
In the same directory, create a file called terraform.tfvars which will
contain Terraform variables used to customize the infrastructure creation
process. We’ll set the following two variables:
cluster_name = "kubeone-cluster"
ssh_public_key_file = "~/.ssh/id_rsa.pub"
The cluster_name variable is used as a prefix for cloud resources.
The ssh_public_key_file is a path to a SSH public key that will be deployed
on instances. KubeOne connects to instances over SSH to provision and configure
them. If you don’t have an SSH key, you can generate one by running
ssh-keygen.
On top of that, some providers might require setting additional variables as described below.
The Terraform config for GCP requires that the project variable is set to the
name of the GCP Project that will be used for deploying a cluster.
The Terraform config for Nutanix requires the following Terraform variables to be provided:
nutanix_cluster_name = "<name-of-the-nutanix-cluster>"
project_name         = "<name-of-the-nutanix-project>"
subnet_name          = "<name-of-the-subnet>"
image_name           = "<name-of-the-image>"
If you don’t use Projects in your Nutanix setup, you can modify the Terraform config to remove usages of the Project. It’s expected that all required resources (including the image) will be provided by the user.
The Terraform config for OpenStack requires that the external_network_name variable
is set to the name of the external network that will be used. It’s expected
that this network already exists.
Additionally, you might be required to provide additional variables such as
image and subnet_cidr depending on your OpenStack setup.
The Terraform config for vSphere might require you to provide the following variables, depending on your setup:
datastore_name     = "<datastore-name>"
network_name       = "<network-name>"
template_name      = "<template-name>"
resource_pool_name = "<resource-pool-name>"
template_name is the name of the VM that will be used as a template for
creating other VMs. It’s expected that this VM already exists. Please check the
vSphere requirements document
for more details.
The terraform.tfvars files can also be used to customize properties such as
instances size. We’ll use the default settings, but if you wish to customize
settings, you can check the
Using Terraform Configs document for more details.
Once the terraform.tfvars file is created, run the plan command to see what
changes will be made:
terraform plan
If you agree with the proposed changes, you can apply them by running the
apply command. You’ll be asked to confirm your intention by typing yes.
If you’re provisioning a cluster on GCP, initial terraform apply requires
variable control_plane_target_pool_members_count to be set to 1.
terraform apply
Due to how GCP Load Balancers work, we’ll only add one control plane instance to the load balancer, and then after the cluster is provisioned, add remaining instances. Otherwise, KubeOne will fail to provision the cluster.
terraform apply -var=control_plane_target_pool_members_count=1
Once initial kubeone apply is done, the
control_plane_target_pool_members_count should not be used.
This command will create all the infrastructure needed to get started. This might take up to several minutes, depending on the cloud provider.
Once terraform apply is complete, check the output and ensure that the
endpoint variable in the kubeone_api block is set (i.e. it’s not an empty
string). If it isn’t set, wait a minute or two, and then run
terraform refresh.
Finally, we need to save the Terraform state in a format that can be parsed by
KubeOne for information about the infrastructure (security groups, IAM roles,
etc.), instances, and load balancer. That information will be used for
accessing the instances, provisioning the cluster, and later for creating the
worker nodes. The format is already defined in a file called output.tf and
everything you need to do is to run the output command:
terraform output -json > tf.json
This command will create a file called tf.json with JSON representation of
the Terraform state that can be parsed by KubeOne. With that done, we’re ready
to provision our cluster which will do in the next step.
Step 5 — Provisioning The Cluster
Now that we have the infrastructure, we can use KubeOne to provision a Kubernetes cluster.
The first step is to create a KubeOne configuration manifest that describes how
the cluster will be provisioned, which Kubernetes version will be used,
and more. The manifest can be saved in a file called kubeone.yaml. In the
following table you can find example configuration manifest for each
supported provider.
apiVersion: kubeone.k8c.io/v1beta2
kind: KubeOneCluster
versions:
  kubernetes: '1.22.5'
cloudProvider:
  aws: {}
Make sure to replace the placeholder values with real values in the cloud-config section.
In the Kubermatic documentation you can find more information regarding how to set up a service account. This service account is needed to proceed.
All required resources (VPCs, Resource Groups, Route Tables…) are created by
Terraform out of the box. The resources are prefixed with your cluster name
defined in terraform.tfvars (Step 4), so you need to replace <cluster-name>
with your cluster name in the cloud-config example below.
Warning: due to Azure limitations, you can have only one Basic SKU Load Balancer per Availability Set. Since we already create a Basic SKU load balancer for the API server in the Availability Set used by control plane nodes, you can’t create other load balancers in the same set. This also means that you can’t create Kubernetes Load Balancer Services because the creation would fail due to the mentioned limit.
To mitigate this, our Terraform configs will create a dedicated Availability Set to be used for worker nodes and Kubernetes Load Balancer Services. With that setup, all pods exposed via a Kubernetes Load Balancer Service must be scheduled on worker nodes. Scheduling pods on control plane nodes would make Azure CCM fail to find underlying instances and add them to the appropriate Azure load balancer because the newly-created load balancer and control plane nodes are in different availability sets.
Please check the Production Recommendations document for more details.
apiVersion: kubeone.k8c.io/v1beta2
kind: KubeOneCluster
versions:
  kubernetes: '1.22.5'
cloudProvider:
  azure: {}
  cloudConfig: |
    {
      "cloud": "AZUREPUBLICCLOUD",
      "tenantId": "<YOUR-TENANT-ID>",
      "subscriptionId": "<YOUR-SUBSCRIPTION-ID>",
      "aadClientId": "<YOUR-CLIENT-ID>",
      "aadClientSecret": "<YOUR-CLIENT-SECRET>",
      "resourceGroup": "<cluster-name>-rg",
      "location": "<YOUR-CLUSTER-REGION>",
      "vnetName": "<cluster-name>-vpc",
      "subnetName": "<cluster-name>-subnet",
      "routeTableName": "<cluster-name>-rt",
      "securityGroupName": "<cluster-name>-sg",
      "primaryAvailabilitySetName": "<cluster-name>-avset-workers",
      "useInstanceMetadata": true,
      "loadBalancerSku": ""
    }
external: true instructs KubeOne to deploy the
DigitalOcean Cloud Controller Manager.
The CCM provides additional cluster features, such as LoadBalancer Services,
and fetches information about nodes from the API.
apiVersion: kubeone.k8c.io/v1beta2
kind: KubeOneCluster
versions:
  kubernetes: '1.22.5'
cloudProvider:
  digitalocean: {}
  external: true
Setting regional = true in the cloud-config is required when control plane
nodes are across multiple availability zones. We deploy control plane hosts
in multiple AZs by default in our example Terraform configs.
apiVersion: kubeone.k8c.io/v1beta2
kind: KubeOneCluster
versions:
  kubernetes: '1.22.5'
cloudProvider:
  gce: {}
  cloudConfig: |
    [global]
    regional = true
Due to how GCP LBs work, initial terraform apply requires variable control_plane_target_pool_members_count to be set
to 1.
terraform apply -var=control_plane_target_pool_members_count=1
Once initial kubeone install or kubeone apply is done, the control_plane_target_pool_members_count should not be
used.
external: true instructs KubeOne to deploy the
Hetzner Cloud Controller Manager.
The Hetzner CCM fetches information about nodes from the API.
apiVersion: kubeone.k8c.io/v1beta2
kind: KubeOneCluster
versions:
  kubernetes: '1.22.5'
cloudProvider:
  hetzner: {}
  external: true
The addons section instruction KubeOne to deploy the CSI driver, the volume
snapshots controller, and the default StorageClass object. It’s optional and
you can remove it if you don’t want the CSI driver and/or the default
StorageClass. If you keep the default-storage-class addon, make sure to
replace the placeholder values.
apiVersion: kubeone.k8c.io/v1beta2
kind: KubeOneCluster
versions:
  kubernetes: '1.22.5'
cloudProvider:
  nutanix: {}
addons:
  enable: true
  addons:
  - name: "csi-nutanix"
  - name: "default-storage-class"
    params:
      storageContainer: "<storage-container-name>" # Default: Default
      fsType: "<>" # Default: xfs
      isSegmentedIscsiNetwork: "<true-or-false>" # Default: false
Make sure to replace the placeholder values with real values in the cloud-config section.
apiVersion: kubeone.k8c.io/v1beta2
kind: KubeOneCluster
versions:
  kubernetes: '1.22.5'
cloudProvider:
  openstack: {}
  cloudConfig: |
    [Global]
    username=OS_USERNAME
    password=OS_PASSWORD
    auth-url=https://OS_AUTH_URL/v3
    tenant-id=OS_TENANT_ID
    domain-id=OS_DOMAIN_ID

    [LoadBalancer]
    subnet-id=SUBNET_ID
external: true instructs KubeOne to deploy the
Equinix Metal Cloud Controller Manager.
The Equinix Metal CCM fetches information about nodes from the API.
It’s important to provide custom clusterNetwork settings in order to avoid
colliding with the Equinix Metal private network which is 10.0.0.0/8.
apiVersion: kubeone.k8c.io/v1beta2
kind: KubeOneCluster

versions:
  kubernetes: "1.22.5"

cloudProvider:
  equinixmetal: {}
  external: true

clusterNetwork:
  podSubnet: "192.168.0.0/16"
  serviceSubnet: "172.16.0.0/12"
Make sure to replace the placeholder values with real values in the
cloud-config section. The vsphere-ccm-credentials Secret is created
automatically by KubeOne as of v1.0.4.
apiVersion: kubeone.k8c.io/v1beta2
kind: KubeOneCluster
versions:
  kubernetes: '1.22.5'
cloudProvider:
  vsphere: {}
  cloudConfig: |
    [Global]
    secret-name = "vsphere-ccm-credentials"
    secret-namespace = "kube-system"
    port = "443"
    insecure-flag = "0"

    [VirtualCenter "1.1.1.1"]

    [Workspace]
    server = "1.1.1.1"
    datacenter = "dc-1"
    default-datastore="exsi-nas"
    resourcepool-path="kubeone"
    folder = "kubeone"

    [Disk]
    scsicontrollertype = pvscsi

    [Network]
    public-network = "NAT Network"
Before proceeding, make sure to select the Kubernetes version that you want
to use, and replace the placeholder values with real values where applicable.
In the following table, you can find a list of supported Kubernetes version
for latest KubeOne versions (you can run kubeone version to find the version
that you’re running).
| KubeOne version | 1.23 | 1.22 | 1.21* | 1.20** | 1.19** |
|---|---|---|---|---|---|
| v1.4+ | ✓ | ✓ | ✓ | ✓ | - |
| v1.3 | - | ✓ | ✓ | ✓ | ✓ |
| v1.2 | - | - | ✓ | ✓ | ✓ |
* Kubernetes 1.21 is in the maintenance mode which means that only critical and security issues are fixed. It’s strongly recommended to upgrade to a newer Kubernetes version as soon as possible.
** Kubernetes 1.20 and 1.19 have reached End-of-Life (EOL). We strongly recommend upgrading to a supported Kubernetes release as soon as possible.
We recommend using a Kubernetes release that’s not older than one minor release than the latest Kubernetes release. For example, with 1.23 being the latest release, we recommend running at least Kubernetes 1.22.
Now, we’re ready to provision the cluster! This is done by running the
kubeone apply command and providing it the configuration manifest and the
Terraform state file that we created in the previous step.
kubeone apply -m kubeone.yaml -t tf.json
This command analyzes the provided instances by running a set of probes to determine is it needed to provision a cluster or is there already a Kubernetes cluster running. If the cluster is already there, the probes will check is the cluster healthy and is the actual state matching the expected state defined by the configuration manifest. This allows us to use one single command for all operations (provision, upgrade, enable features, and more). This process is called Cluster Reconciliation and is described with additional details in the Cluster Reconciliation document.
The output will show steps that will be taken to provision a cluster. You’ll be
asked to confirm the intention to provision a cluster by typing yes.
INFO[11:37:21 CEST] Determine hostname…
INFO[11:37:28 CEST] Determine operating system…
INFO[11:37:30 CEST] Running host probes…
The following actions will be taken:
Run with --verbose flag for more information.
	+ initialize control plane node "ip-172-31-220-51.eu-west-3.compute.internal" (172.31.220.51) using 1.20.4
	+ join control plane node "ip-172-31-221-177.eu-west-3.compute.internal" (172.31.221.177) using 1.20.4
	+ join control plane node "ip-172-31-222-48.eu-west-3.compute.internal" (172.31.222.48) using 1.20.4
	+ ensure machinedeployment "marko-1-eu-west-3a" with 1 replica(s) exists
	+ ensure machinedeployment "marko-1-eu-west-3b" with 1 replica(s) exists
	+ ensure machinedeployment "marko-1-eu-west-3c" with 1 replica(s) exists

Do you want to proceed (yes/no):
After confirming your intention to provision the cluster, the provisioning will start. It usually takes 5-10 minutes for cluster to be provisioned. At the end, you should see output such as the following one:
...
INFO[11:46:54 CEST] Downloading kubeconfig…
INFO[11:46:54 CEST] Ensure node local DNS cache…
INFO[11:46:54 CEST] Activating additional features…
INFO[11:46:56 CEST] Applying canal CNI plugin…
INFO[11:47:10 CEST] Creating credentials secret…
INFO[11:47:10 CEST] Installing machine-controller…
INFO[11:47:17 CEST] Installing machine-controller webhooks…
INFO[11:47:17 CEST] Waiting for machine-controller to come up…
INFO[11:48:07 CEST] Creating worker machines…
At this point, your cluster is provisioned, but it may take several more minutes for worker nodes to get created by Kubermatic machine-controller and joined the cluster. In meanwhile, you can configure the access to the cluster.
If you’re running on GCP, in the Creating The Infrastructure step we’ve added
only one control plane instance to the load balancer. Now that the cluster is
provisioned, we can add the remaining instances. To do that, you just need to
run Terraform again, but this time without the
control_plane_target_pool_members_count variable:
terraform apply
Step 6 — Configuring The Cluster Access
KubeOne automatically downloads the Kubeconfig file for the cluster. It’s named
as <cluster_name>-kubeconfig, where <cluster_name> is the name
provided in the terraform.tfvars file. You can use it with kubectl such as:
kubectl --kubeconfig=<cluster_name>-kubeconfig
or export the KUBECONFIG environment variable:
export KUBECONFIG=$PWD/<cluster_name>-kubeconfig
If you want to learn more about kubeconfig and managing access to your clusters, you can check the Configure Access To Multiple Clusters document.
You can try to list all nodes in the cluster to confirm that you can access the cluster:
kubectl get nodes
You should see output such as the following one. You should have three control plane node and one (three for AWS) worker node(s). If you don’t see all worker nodes yet, note that it might take several minutes for all nodes to join the cluster.
NAME                                           STATUS   ROLES    AGE   VERSION
ip-172-31-220-166.eu-west-3.compute.internal   Ready    <none>   38m   v1.20.4
ip-172-31-220-51.eu-west-3.compute.internal    Ready    master   43m   v1.20.4
ip-172-31-221-177.eu-west-3.compute.internal   Ready    master   42m   v1.20.4
ip-172-31-221-18.eu-west-3.compute.internal    Ready    <none>   38m   v1.20.4
ip-172-31-222-211.eu-west-3.compute.internal   Ready    <none>   38m   v1.20.4
ip-172-31-222-48.eu-west-3.compute.internal    Ready    master   41m   v1.20.4
Conclusion
Congratulations!!! You have successfully provisioned a Kubernetes cluster using Kubermatic KubeOne. You’re now ready to run your workload on this cluster. We recommend checking the following learn more section for additional resources and recommendations.
Learn More
- Learn how to upgrade your cluster by following the Upgrading Clusters tutorial
- If you don’t need your cluster anymore, you can check the Unprovisioning Clusters tutorial to find out how to unprovision the cluster and remove the infrastructure
- You can find additional production recommendations in the Production Recommendations document
- Learn how to use KubeOne to set up a cluster with OIDC Authentication and Audit Logging in the following tutorial
- Learn more about Kubermatic machine-controller and how we use it to create worker nodes in the following guide